
Home > 产品 > 饰品 > Junction Box (JS-100A, A-6)
- 产品
- 饰品
-
- Junction Box [JS-100A, A-6] (MAKER : RAYCHEM)
- Contents

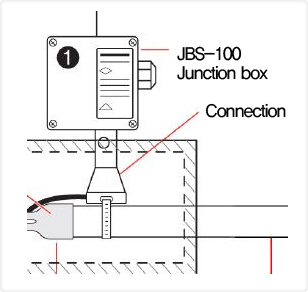
-
Item Qty Description A 1 Stand B 1 Core sealer C 1 Green/yellow tube D 1 Cable lubricant E 1 Cable tie F 1 Lid G 1 Box with terminal block -

-
Tool Required- Wire cutters
- Needle nose pliers
- Pliers or adjustable wrench
- Large slotted screwdriver
- Utility Knife
- Marker
- 1/4” or smaller flat-blade screwdriver
- Wire stripper (for VPL-CT)
-
Additional Material Required
- Pipe strap
- CM-ESS-0 Jacket patch kits

- Installation Guide
-
- 1
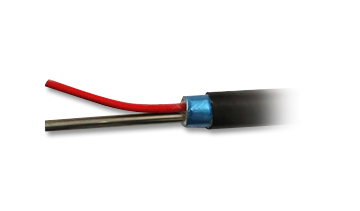
- ∙Remove the outer FR-PVC Jacket and insulation from end to approximately 24”(60cm).
- 2
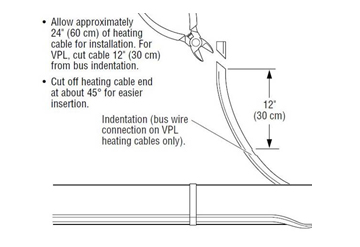
- ∙Allow approximately 24”(60cm) of heating cable for installation
∙Cut off heating cable end at about 45° for easier insertion.
-
- 3
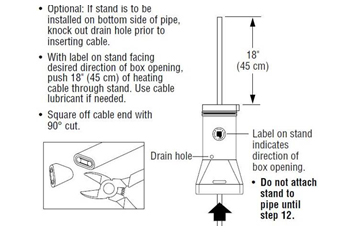
- Optional :
If stand is to be installed on bottom side of pipe, knock out drain hole prior to inserting cable.
∙With label on stand facing desired direction of box opening, push 18”(45cm) of heating cable through stand. Use cable lubricant if needed.
∙Square off cable end with 90° cut
- 4
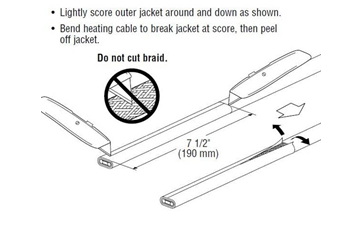
- ∙Lightly score outer jacket around and down as shown
∙Bend heating cable to break jacket at score, then peel off jacket.
-
- 5
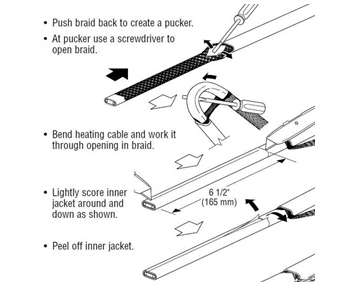
- ∙Push braid back to create a pucker
∙At pucker use a screwdriver to open braid
∙Bend heating cable and work it through opening in braid
∙Lightly score inner jacket around and down as shown
∙Peel off inner jacket
- 6
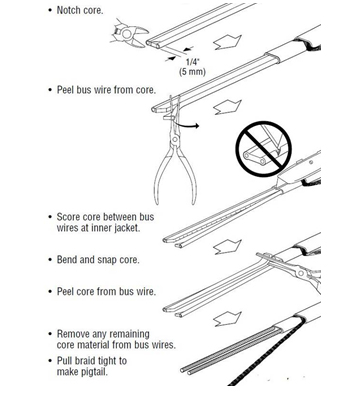
- ∙Notch core
∙Peel bus wire from core
∙Score core between bus wires at inner jacket
∙Bend and snap core
∙Peel core from bus wire
∙Remove any remaining core material from bus wires
∙Pull braid tight to make pigtail as shown
-
- 7
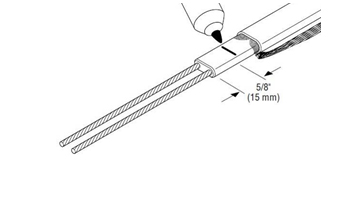
- Mark the jacket as shown
- 8
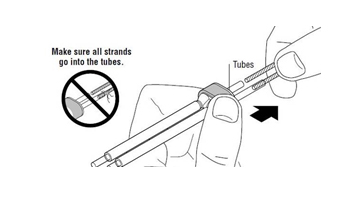
- CAUTION : Must wash hands after contact with sealant.
∙If needed, re-twist and straighten bus wires, then insert into the guide tubes as shown.
-
- 9
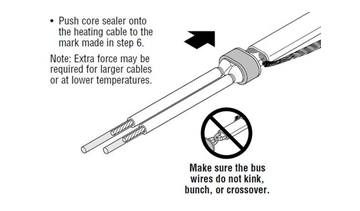
- ∙Push core sealer onto the heating cable to the mark
- 10
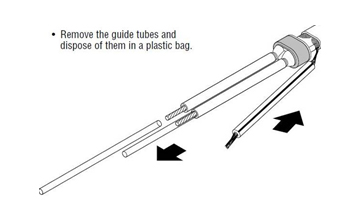
- ∙Remove the guide tubes and dispose of them in a plastic bag.
-
- 11
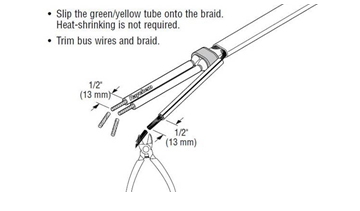
- ∙Slip the green/yellow tube onto the braid. Heat-shrinking is not required.
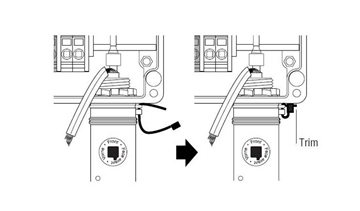
∙Trim bus wires and braid
- 12
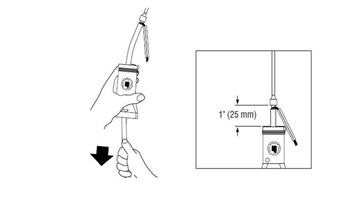
- ∙Pull heating cable back into stand so 1”(25mm) is exposed as shown.
∙Use cable lubricant if needed.
-
- 13
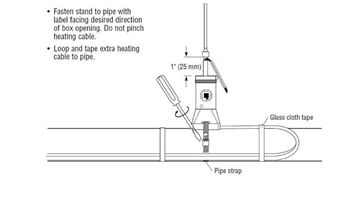
- ∙Fasten stand to pipe with label facing desired direction of box opening.
∙Do not pinch heating cable.
∙Loop and tape extra heating cable to pipe.
- 14
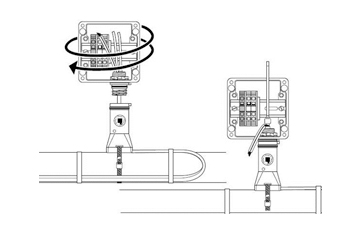
- ∙Screw box onto stand until it stops.
∙Do not over-tighten
-
- 15
- ∙This kit uses spring clamp style terminals.
Terminals use a steel spring to clamp the wire to provide improved vibration resistance, reduced maintenance and faster installation
∙이 킷트는 Spring clamp style terminals에 사용한다.
∙Steel spring을 와이어에 걸어 사용하는 Terminal은 진동 저항을 강화시켜주고, 유지관리를 줄여주며, 빠른 설치를 제공한다.
- 16
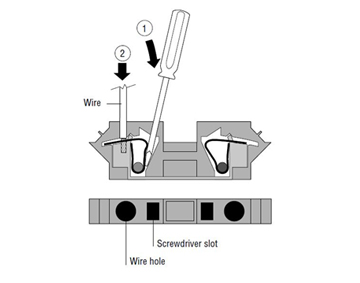
- ∙To connect wires, firmly insert a slotted screwdriver into the square hole(①)to open the spring.
∙When fully inserted, the screwdriver will lock into place, allowing you to remove your hand and insert the wire into the round hole(②).
∙Remove the screwdriver to clamp the wire
-
- 17
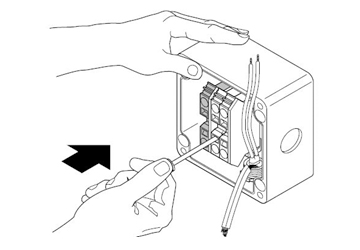
- ∙Push screwdriver FIRMLY into square hole.
- 18
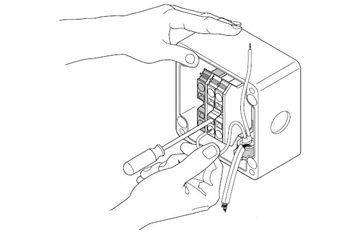
- ∙Insert wire into round hole
∙Use green terminal for braid and ground wire.
-
- 19
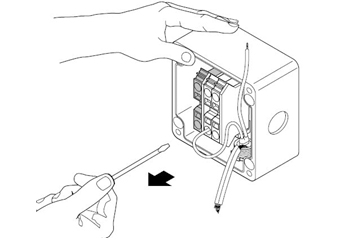
- ∙Remove screwdriver
- 20
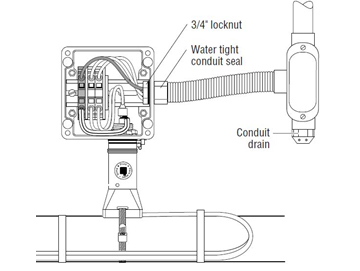
- ∙Install conduit and fittings as shown.
∙To minimize loosening due to pipe vibration, use flexible conduit.
∙Pull in power and ground wires, strip off 1/2”(13mm) of insulation and terminate.
-
- 21
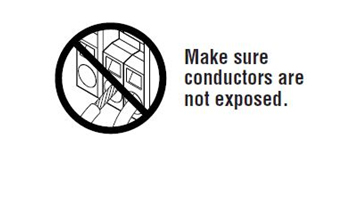
- ∙Make sure Conductor are not exposed.


